|
|
I have included file sizes in the image links. Please take a moment to check these sizes before you begin downloading images for viewing. Several of the JPS files are very large and will be painful to download over a modem link. The images are presented in cross-eye
and anaglyph format. If you prefer a different format or size, please give
the Stereoscope applet a try. |
|
|
|
|
[ Back ] [ Up ]
Alignment
 For my A100 twin, I built
a "camera, glue, spacer, glue, camera" sandwich and clamped it top and bottom with my bar clamps. Then, I turned on both cameras, placed them on a horizontal surface
and aimed them across the room. I then adjusted their relative rotation until the same object was bumping the top of the LCD viewfinder on both cameras.
The next day, when I unclamped the cameras, I was disappointed with the resulting alignment. Hindsight told me that:
For my A100 twin, I built
a "camera, glue, spacer, glue, camera" sandwich and clamped it top and bottom with my bar clamps. Then, I turned on both cameras, placed them on a horizontal surface
and aimed them across the room. I then adjusted their relative rotation until the same object was bumping the top of the LCD viewfinder on both cameras.
The next day, when I unclamped the cameras, I was disappointed with the resulting alignment. Hindsight told me that:
- My 26" bar clamps were just over kill for the project. Their jaws weren't parallel and their weight was too great. They were probably distorting the camera alignment as they were holding it.
- The resolution of the LCD viewfinder was of insufficient precision for the job I had asked of it.
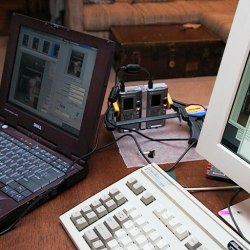
For the A200, I did it a little differently. I bought a new bar clamp (6" Quick-Grip) and connected each camera to a separate computer running the Canon "Remote Capture" application. The new clamp is significantly lighter than my old ones. Its jaws are parallel and it is able to make very small adjustments in tension. One clamp across the middle of the camera held them securely. By angling its handle down to the desk, I was able to keep everything very stable while performing the final alignment adjustments. Using the "Remote Capture" application and a network, I was able to capture images from both cameras, and view them both on the same large computer screen. By comparing the position of a horizontal feature in both images, I was able to fine tune the alignment of the two cameras.
Since I was using fast setting 3M adhesive (5220), I spent an hour doing a dry run. I did all of the setup, picture taking and alignment without the glue. Then I took it apart, spread the glue and spent about fifteen minutes to achieving a good alignment. The result was much better than my A100 and worth the effort. Depending on who is doing the counting, the two cameras are either one or four pixels out of alignment. Not bad when we're talking about an image height of 1600 pixels.
Power Concerns
After the agonizing over the power issues on the the A100 twin, I
decided to skip that step on the A200 twin. I have seen no adverse effects
of this decision. Were I do to it again, I would do it just this
way. Shutter switches cabled in parallel and fully independent power
supplies.
How does it compare to the A100
 The
A100 cameras were more light sensitive than the A200. This only makes
sense since the cameras have the same sized sensors. Placing a larger
number of pixels in the same space means each is smaller and can gather less
light.
The
A100 cameras were more light sensitive than the A200. This only makes
sense since the cameras have the same sized sensors. Placing a larger
number of pixels in the same space means each is smaller and can gather less
light.
Flash synch is still problematic. It take about three flash shots to get
one evenly exposed pair.
Shutter synch is pretty darned good. By taking a picture of a stop watch,
I was able to confirm that the cameras were firing within 1/100 second of each
other. This is assuming, of course, that I have half pressed the shutter
button to focus and exposure lock them.
As a point and shoot stereo camera it is great. It is pretty well
balanced. It fits in my hands, and is easy to carry in a padded CD
case. It is also relatively inconspicuous when compared to my older A5
twin on its bar.