|
|
I have included file sizes in the image links. Please take a moment to check these sizes before you begin downloading images for viewing. Several of the JPS files are very large and will be painful to download over a modem link. The images are presented in cross-eye
and anaglyph format. If you prefer a different format or size, please give
the Stereoscope applet a try. |
|
|
|
|
Narrowing In |
|
If you are shooting slide film and mounting them in cardboard mounts with 50x50 apertures, the stock format is doing you no favors.
 |
Shown here is the back of a stock Rolleidoscop which produces images that are 61x56mm (WxH). The film advance window is shown for reference. |
You must crop 11mm from the width of each image and it is almost impossible to get six images on a roll of 120 film. By narrowing the film apertures by just few millimeters we can easily get six stereo images on a roll and the images still fit perfectly in 50x50 slide mounts.
 |
Shown here is the back of the narrowed Rolleidoscop which produces images that are almost square 57x56mm (WxH) and gets six images to a roll. |
Making it Happen
The modification is actually not very difficult. The most difficult part for me was getting up the nerve to do it!
 I
started with two strips of 3.5mm styrene and carefully trimmed them to length
and shaped them to fit the inside corners of the original back. Styrene is
easy to cut and shape, and inexpensive. It doesn't break the bank to spoil
a few strips as you try to get the perfect fit. I used a set of fine files
for the shaping but an emery board or some very fine sand paper would work just
as well. Since I started with white styrene, I took a minute to blacken
the strip after they were shaped. The strips were then glued into place
with a very small amount of two-part epoxy and left to dry.
I
started with two strips of 3.5mm styrene and carefully trimmed them to length
and shaped them to fit the inside corners of the original back. Styrene is
easy to cut and shape, and inexpensive. It doesn't break the bank to spoil
a few strips as you try to get the perfect fit. I used a set of fine files
for the shaping but an emery board or some very fine sand paper would work just
as well. Since I started with white styrene, I took a minute to blacken
the strip after they were shaped. The strips were then glued into place
with a very small amount of two-part epoxy and left to dry.
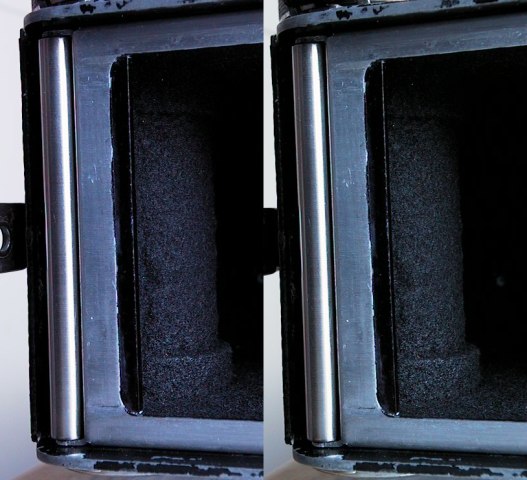
The result is what you see here. A snug fitting shim that will remove 3.5mm from the outside edge of each half of your stereo pair. The image to the left is linked to a cross-eyed stereo pair to better show the installation.
What remains to be done is adjust
the film advance sequence to take advantage of the reduced film usage. Next
![]()
[ Stock Advance ] [ Narrowing the Image ] [ New Advance ]