|
|
I have included file sizes in the image links. Please take a moment to check these sizes before you begin downloading images for viewing. Several of the JPS files are very large and will be painful to download over a modem link. The images are presented in cross-eye
and anaglyph format. If you prefer a different format or size, please give
the Stereoscope applet a try. |
|
|
|
|
[ Back ] [ Next ]
Examination
Once we have the core free, it is easy to see that this is going to be quite a bit easier than working on the A5. Everything comes completely free of the cases. There are fewer components and even air visible between them!

Looking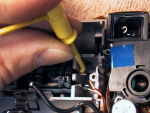 straight down on the
face, we can see all sorts of interesting things. First that black 55
gallon drum in between the battery slots. It is a capacitor stores energy for
the flash. First order of business is to discharge that puppy. Carefully connect a couple of alligator or micro clips to its leads and connect
their other ends to a couple of cheap screwdrivers. Then, touch the two
screw drivers together. The resulting flash and arc will convince you why
this was a good thing to do and why you should have used cheap screwdrivers
rather than your $20 Snap-On. In the photo to the left, you can see that I
have moved the negative battery cable to allow easier access to the capacitor
leads.
straight down on the
face, we can see all sorts of interesting things. First that black 55
gallon drum in between the battery slots. It is a capacitor stores energy for
the flash. First order of business is to discharge that puppy. Carefully connect a couple of alligator or micro clips to its leads and connect
their other ends to a couple of cheap screwdrivers. Then, touch the two
screw drivers together. The resulting flash and arc will convince you why
this was a good thing to do and why you should have used cheap screwdrivers
rather than your $20 Snap-On. In the photo to the left, you can see that I
have moved the negative battery cable to allow easier access to the capacitor
leads.
With that out of the way, you can start looking around and you'll notice great big solder pads and wires connecting the batteries to the power supply board in the lower right corner. Those solder pads will be important later, but consider the size of those power leads. Those leads have to be large enough to carry the1.4 amps used during the auto focus and sensor preparation cycle. Yes, folks, 1.4 amps. No wonder the batteries don't last long.
|
On the bottom, you can see
The two gaps near the CF socket are significant in that they traverse the entire height of the case. The gap to the right of the battery compartment is significant in that it is a large hole near the power supply cables.
|
On the top you can see
|